Pic Scanner Gold offers full privacy and control by saving scans only on the device on which you scan them. Nothing is uploaded to or stored in a remote server. However, this also means that you must periodically back up the photos on your computer, in a cloud storage service, or on another iPhone to iPad. It’s easy, and you can do it in under a minute with our Back Up feature.
When to use Back Up
You can use the Back Up feature for the following cases:
- When you get a new iPhone or iPad and want to transfer photos, albums and captions from Pic Scanner Gold (or Pic Scanner) on the old device to the same app on your new device
- To transfer photos, albums and captions from iPhone to iPad, from iPad to iPhone, or to a PC.
- To back up your photos, albums and caption on your computer or in cloud storage e.g. Dropbox, Google Photos etc.
When not to use Back Up
This feature isn’t meant for transferring scans from Pic Scanner (our lite app) to Pic Scanner Gold on the same device. To do this, use the Migrate function in Pic Scanner.
Also don’t use Back Up to export items to the Photos app, Facebook, email etc. The function for doing this is Export. Go to Gallery or an album > tap Select > choose the photos for export > Export > select from the options shown.
How to Copy from one iOS device to another
To transfer assets from old iPhone to new, or from iPhone to iPad, first ensure that you have Pic Scanner Gold on both devices, both devices use the same WIFI, and Airdrop is ‘on’ on both.
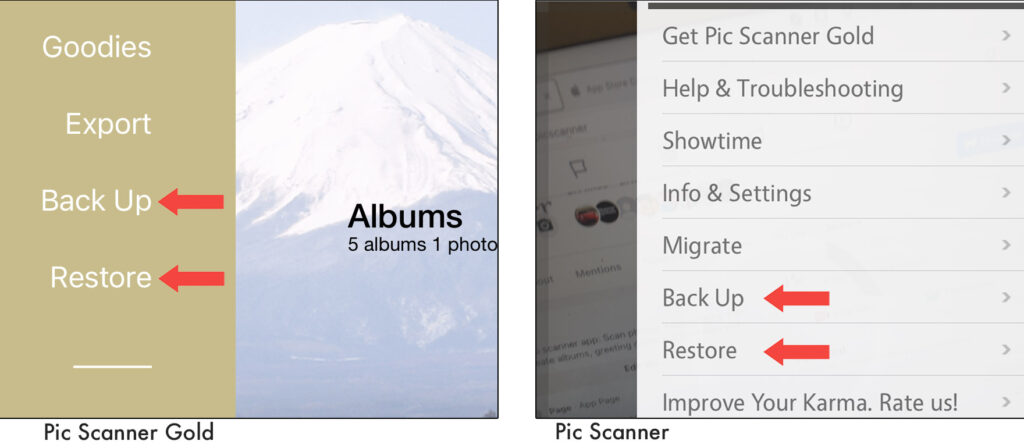
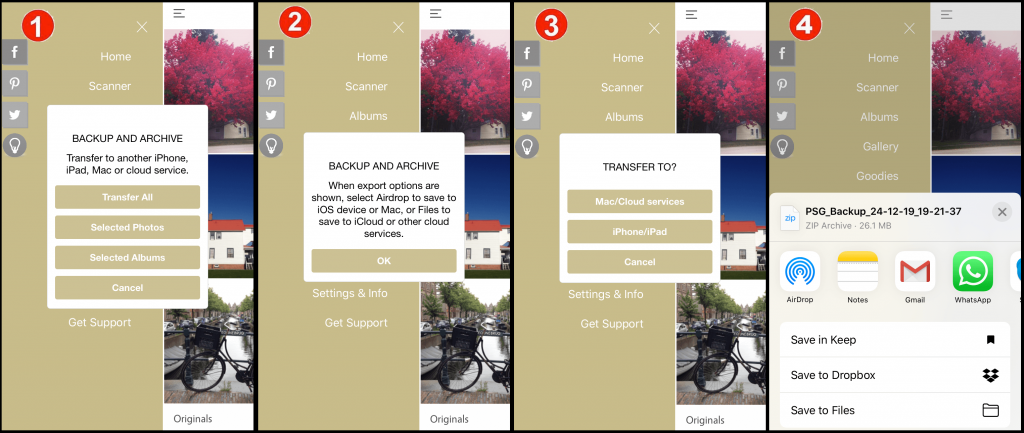
Launch Pic Scanner Gold on the source device > tap Menu > Back Up. You’ll see the message below:

Select Transfer All, Selected Photos or Selected Albums. The selected assets will be compressed > From the list of export destinations, choose Airdrop.
From the list of Airdrop-connected devices, select the target device (the one to which you want to transfer the assets). If the target device asks you to accept incoming files, do so. This will save the zip file in the Files app on the target device, with the extension .psmf.
Now launch Pic Scanner Gold on the target device > tap Menu > Restore > the Files app window will open > select the .psmf file you just saved > All selected assets (including albums and captions, if any) will be copied across to the target device.
Note that this won’t overwrite any preexisting photos or albums in Pic Scanner Gold on the target device, so you can repeat this transfer any time to export more photos.
Copy from iOS device to Mac
To make a full back up of all photos, albums and captions from Pic Scanner Gold on your iPhone or iPad to your Mac, first check whether or not your Mac and iOS device support Airdrop.
> For Macs that support Airdrop:
Ensure that the iOS device and the Mac are both on the same WIFI network, and Airdrop is enabled on both. Then follow Steps 2 and 3 listed above (Below are the screens and messages you will see).
Once export options are displayed, wait until the Mac appears in the list of Airdrop devices. Select it. If Mac asks you to accept the incoming file, accept. The backup is saved as a zip file on the Mac.
> For Macs that don’t support Airdrop:
Do you have an older Mac that doesn’t support Airdrop, or you can’t use Airdrop for any reason? If so, follow Steps 2 and 3 above. And then, in export options, choose Files > Desktop. The backup are saved as a zip file on the Mac. Save the zip file backup in iCloud, Dropbox or another cloud service, and give it a name you’ll remember, should you need to restore from it.
To view the photos on Mac and share them, unzip the backup. The unzipped folder will contain a number of files and sub-folders. Click open Splitted_Images, and you’ll see all the photos from Gallery screen on Pic Scanner Gold.
Copy from iOS device to PC
In Pic Scanner Gold, tap Menu > Backup > Transfer All, Selected Photos or Selected Albums > > Transfer to: iCloud/Cloud services > When export options are shown, select Dropbox (or any other cloud storage service) > a zipped folder containing all photos from the selected album will be uploaded. After the upload is complete, you can access the cloud service from your PC, unzip the folder, and copy the photos to any location you want.
How often should you back up files?
Whenever you scan photos, create or edit albums or captions, your app data changes – and this is the trigger to make a new backup. Keep two or three recent backups, because more is better than less! It’s fast, and once you’ve unlocked Back Up, you have unlimited use of this feature.
Restoring photos from backup to iPhone or iPad
If you lose or damage your iPhone or iPad, or delete Pic Scanner Gold from your iOS device, you can restore all app data using the last backup on your Mac. Here’s how:
- Locate the latest backup on your Mac, and change its file extension from .zip to .psmf. You may get an alert asking you to confirm the change – accept it.
- Ensure that the iOS device and the Mac are both on the same WIFI network and Airdrop is ‘ON’ on both. Install Pic Scanner Gold on the iOS device.
- Send the .psmf file to iPhone or iPad via airdrop. If the iOS device asks whether to accept incoming files, accept. The zip file will be saved in the Photos app on the target device with .psmf extension.
- Launch Pic Scanner Gold on the target device > tap Menu > Restore > the Files app window will open > select the .psmf file you just saved > All selected assets (including albums and captions, if any) will be copied across to the target device.
If anything is unclear or you get stuck somewhere, please email us via the app.
Have you seen our new app SnipTag yet?
SnipTag for Mac is the world’s only app for cropping entire batches of multi-photo scans with one click. Scan in JPG, PNG, TIFF or BMP formats at ANY resolution! And you can add captions and metadata to photos with voice dictation. Start a free 3-day trial now, because there is no other app so useful for your paper as well as digital photos!
[Website][Mac App Store link]