How to export photos from Pic Scanner Gold to Mac, PC or other locations

After scanning and editing photos, and maybe arranging them in albums, you can export them from Pic Scanner Gold or Pic Scanner app to other devices or cloud, or share with family and friends.
Both Pic Scanner Gold and Pic Scanner apps let you freely export scanned photos. There are two main ways to do it: Export and Back Up.
When to use Export
Use Export function when you want to transfer selected photos (with or without captions):
- Up to a hundred selected scans to Photos app on your Mac, iPhone or iPad
- Up to a hundred photos to external drive or cloud storage services such as Dropbox, iCloud, Google Drive, OneDrive etc.
- A few photos to Facebook, Twitter or other social networks
- A few photos via email or messaging services.
This document explains how to use the Export function.
When to use Back Up
Use the Back Up feature when you want to transfer all or a large number of photos (with or without captions) and albums:
- From Pic Scanner Gold on old iPhone or iPad to a new one
- From iPhone to iPad, or from iPad to iPhone
- To your computer, external drive or in a cloud location e.g. Dropbox, Google Photos etc.
To learn how to use Back Up feature, please read this.
How to use Export function
.
If you can use Airdrop
This is the fast and easy way. Your iPhone or iPad and Mac should support Airdrop. The device and Mac should be on the same wifi network and set up for Airdrop.
In Pic Scanner Gold, go to Gallery (or Cropped in Pic Scanner) > tap Select > choose photos > tap Export > choose Exclude (or Include) captions > This sharing options screen will appear:
To save photos to your Mac, wait for the Mac to appear among Airdrop devices, then Airdrop it.
If you can’t use Airdrop
On older Macs that don’t support Airdrop, or if you can’t use Airdrop for any reason:
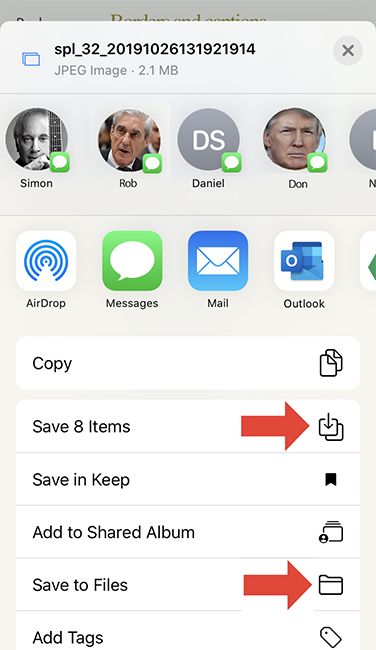
In Pic Scanner Gold, go to Gallery (or Cropped in Pic Scanner) > tap Select > choose photos > tap Export > Exclude or Include captions > Sharing options screen will appear.
- To save to Photos app on your device, tap ‘Save x items’. Photos will be saved to Photos app on device, and if iCloud is enabled, also sync to Photos app on Mac.
- To save to Mac or cloud services, tap ‘Save to Files’. You’ll see the following screen:
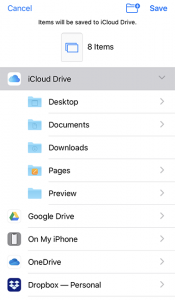
Choose Desktop to save photos on your Mac desktop. Or choose your cloud service to save photos in it (e.g. Google Drive, OneDrive or Dropbox in the screen shot above).
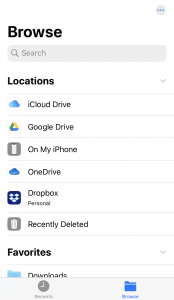
Save to Files: Dropbox, Google Drive etc.
If your preferred cloud storage service e.g. Dropbox isn’t listed on the above screen, check whether you have that cloud app installed on your device and are signed into it. If you do, and still don’t see it listed, open Files app on your device. You should see a screen like this:
Exporting to Mac or PC via USB cable
Use this only if you use a PC, or can’t use the above methods for some reason. This will save all photos from Pic Scanner Gold’s Gallery (or Pic Scanner’s Cropped) screen on your computer.
From iPhone/iPad to Windows PC
- Connect iPhone or iPad to computer via USB cable. Launch iTunes on computer, and select your device [See (1) below].
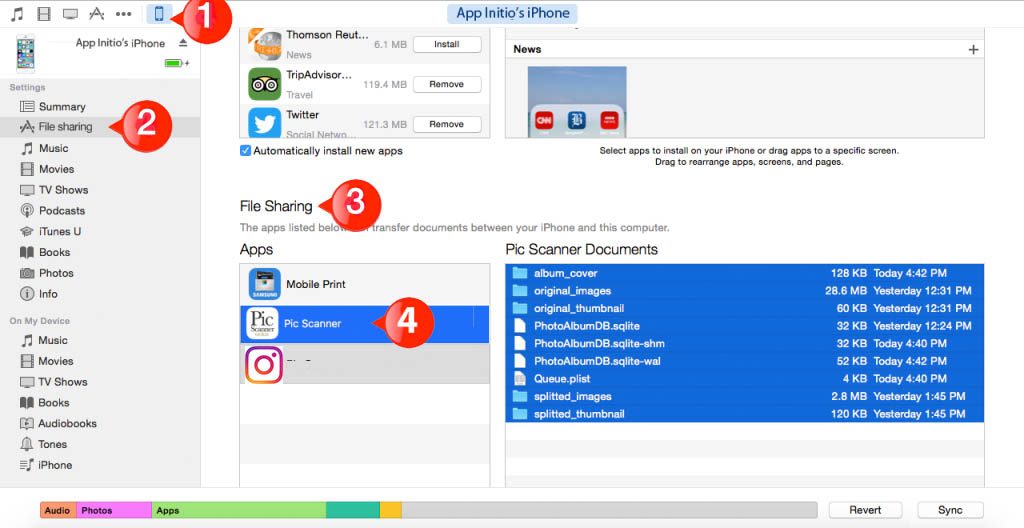
- Click File Sharing in iTunes sidebar on the left [(2) above]. The right pane will show all the apps whose data is backed up [(3) above].
- Click on Pic Scanner Gold or Pic Scanner [(4) above]. Further right side will show some folders and files e.g. original_images, splitted_images, etc. Select splitted_images FOLDER, and drag it onto computer’s desktop. This folder will have all the photos you have on your Gallery (Pic Scanner Gold) or Cropped (Pic Scanner) screens.
- Close iTunes and disconnect your device from the computer. On computer desktop, rename the folder from splitted_image to whatever you want.
From iPhone/iPad to Mac
Broadly similar to the method for PC given above, but instead of iTunes you will use Finder.
- Connect iPhone or iPad to computer via USB cable. On the computer, open a Finder window. In the sidebar, under Devices, click on your iPhone or iPad. Click on the Files Tab
- From the list of apps displayed, click on Pic Scanner Gold. You’ll see a list of files and folders in the right side pane.
- Drag “Splitted Images” folder to your Desktop or any other location. It contains all the photos saved in Pic Scanner Gold’s Gallery.